
Live Streaming with a Mixer, a Computer, and Streaming Software
Author: John Wilson
[email protected]
Date: February 10, 2021
Disclaimer: The opinions expressed in this article are those of the author and are not necessarily those of Ottawa Jazz Happenings or of JazzWorks Canada.
1.0 Introduction
The purpose of this article is to share some of the technical methods that may be used and issues that may be encountered in transmitting your music and accompanying video, via Facebook Live, when using any of the following devices:
The article identifies and illustrates potential problem areas that should be investigated and solutions that should be tested when using these technologies. The depth and coverage of each is limited to its usage by the author for this situation; this is not intended as a comprehensive tutorial for any of the equipment or software used.
The author ran into a number of roadblocks when testing equipment and connections for Cuppa Joe’s Facebook Live show on December 15th, 2020; and this was the inspiration for writing this article — to provide guidance “from the trenches” for those seeking similar solutions. Each element included in the transmission to Facebook Live adds a level of complexity to your solution; so each should be chosen with care to manage the technical risks involved in hosting a live-streamed concert.
Integrating these various elements proved to be a successful solution for Cuppa Joe’s concert; however, it did take a fair bit of time to test each scenario. Using a mixer was a “given” for us, to mix the sound from our four microphones. But we had expected to reach Facebook Live simply from a phone. As discussed below, this did not work, which is the reason that we moved to a computer and then added streaming software.
The approach taken by the author is to describe the elements, connections, and solution in an equipment-agnostic way, so they can be appreciated regardless of the brands of devices used. A Case Study format is also included, to illustrate the situations that the author found with his specific equipment. It’s hoped that this will assist in identifying similar situations with the reader’s setup. It may help some readers with specific solutions to some situations, if that reader is using the same or similar equipment. The main thread of the article is an overview, while the case studies provide the specific guidance.
The article’s main sections are posed as questions about why this path was taken for Cuppa Joe’s live stream concert. Understanding why these elements were used should help others determine whether and/or when they might include them in their solution for connecting to Facebook Live in hosting a virtual concert.
The purpose of this article is to share some of the technical methods that may be used and issues that may be encountered in transmitting your music and accompanying video, via Facebook Live, when using any of the following devices:
- a mixer,
- a computer, or
- a computer running streaming software.
The article identifies and illustrates potential problem areas that should be investigated and solutions that should be tested when using these technologies. The depth and coverage of each is limited to its usage by the author for this situation; this is not intended as a comprehensive tutorial for any of the equipment or software used.
The author ran into a number of roadblocks when testing equipment and connections for Cuppa Joe’s Facebook Live show on December 15th, 2020; and this was the inspiration for writing this article — to provide guidance “from the trenches” for those seeking similar solutions. Each element included in the transmission to Facebook Live adds a level of complexity to your solution; so each should be chosen with care to manage the technical risks involved in hosting a live-streamed concert.
Integrating these various elements proved to be a successful solution for Cuppa Joe’s concert; however, it did take a fair bit of time to test each scenario. Using a mixer was a “given” for us, to mix the sound from our four microphones. But we had expected to reach Facebook Live simply from a phone. As discussed below, this did not work, which is the reason that we moved to a computer and then added streaming software.
The approach taken by the author is to describe the elements, connections, and solution in an equipment-agnostic way, so they can be appreciated regardless of the brands of devices used. A Case Study format is also included, to illustrate the situations that the author found with his specific equipment. It’s hoped that this will assist in identifying similar situations with the reader’s setup. It may help some readers with specific solutions to some situations, if that reader is using the same or similar equipment. The main thread of the article is an overview, while the case studies provide the specific guidance.
The article’s main sections are posed as questions about why this path was taken for Cuppa Joe’s live stream concert. Understanding why these elements were used should help others determine whether and/or when they might include them in their solution for connecting to Facebook Live in hosting a virtual concert.
2.0 Why use a mixer?
We (Cuppa Joe) use a mixer to blend our four voices, as it allows us to balance the relative volumes, to “profile” the relative pitches (hi, mid and low frequencies) of each of the vocalists, and to add reverb to provide the type of room dynamics that suit our sound. The pitch profiling may also be valuable for instruments and is not often available on amplifiers or multi-input speakers. So you may wish to use a mixer if you need to blend the sound from multiple instruments — even to blend the signal quality and levels of a voice and guitar. See a photo of our L-12 mixer, below, in Image A.1 of “Case Study A — ZOOM LiveTrak L-12 Mixer Channel Assignment”.
A mixer is more important in live streaming than in a live show at an external venue, as the sound needs to be “collected” and “sent” to Facebook Live. If instead you use a single external USB microphone, or the one in your phone or computer, to pick up the room sound from the voice(s) and instrument(s), then you will also pick up whatever ambient sounds are present in your living room or basement. The results may be positive, depending on the shape and reflective surfaces of the room, or cause too much echo or other unwanted sound. And you don’t have control over the relative volumes of the voices and instruments, nor their pitch profiles.
A mixer typically provides a (2-channel) stereo output. This is the feed used to deliver your sound to Facebook Live.
3.0 Why use a computer (versus a phone or tablet)?
Generally speaking, a phone or tablet is an easier method than a computer for delivering your sound to Facebook Live, simply because you connect directly to Facebook through an app, so there isn’t a web browser involved. Not all browsers, or all versions of some browsers, support Facebook Live. So using a computer for your show does add some complexity and risk to your technical solution.
In Cuppa Joe's case, our mixer delivers the mixed stereo output over USB Channels 13 and 14, whereas Facebook Live and some other applications expect the output on Channels 1 and 2.
So Cuppa Joe had no choice but to use a computer for our live stream show. There is currently no way to re-assign those channels (for our mixer) via an iOS device like an iPhone. But, fortunately the computer-based driver for Cuppa Joe’s mixer does provide the ability to change the assignment of the output channels that are fed to applications like Facebook Live, as is described below in “Case Study D — ZOOM LiveTrak L-12 Mixer's Computer-based Driver”.
Generally speaking, a phone or tablet is an easier method than a computer for delivering your sound to Facebook Live, simply because you connect directly to Facebook through an app, so there isn’t a web browser involved. Not all browsers, or all versions of some browsers, support Facebook Live. So using a computer for your show does add some complexity and risk to your technical solution.
In Cuppa Joe's case, our mixer delivers the mixed stereo output over USB Channels 13 and 14, whereas Facebook Live and some other applications expect the output on Channels 1 and 2.
- See “Case Study A — ZOOM LiveTrak L-12 Mixer Channel Assignment” below, as this is important background for the rest of this article.
- “Case Study B — Viewing Mixer on iPhone” and “Case Study C — Viewing Mixer Channels” illustrate how to view your mixer and the mixer channels on an iOS device such as an iPhone, to determine whether you can use that device instead of a computer for your Facebook Live streaming concert.
So Cuppa Joe had no choice but to use a computer for our live stream show. There is currently no way to re-assign those channels (for our mixer) via an iOS device like an iPhone. But, fortunately the computer-based driver for Cuppa Joe’s mixer does provide the ability to change the assignment of the output channels that are fed to applications like Facebook Live, as is described below in “Case Study D — ZOOM LiveTrak L-12 Mixer's Computer-based Driver”.
4.0 Why use streaming software?
It is much simpler to use Facebook Live if you can avoid the complexity of using streaming software. Using streaming software, in addition to a web browser, increases the complexity — and therefore the risks involved — in hosting your live stream.
In our case, the MacBook‘s camera wasn’t nearly the quality of the iPhone’s, so we decided to use an iPhone as the video camera and the mixer for audio. Streaming software allowed us to blend those sources via the MacBook, feeding the result to Facebook Live. Although it’s possible to use Facebook Live directly to combine inputs, problems have been reported using it this way.
OBS streaming software was recommended, and it worked well for us. However, there are a number of configurations needed in order for it to run smoothly, as described below in “Case Study E — Using OBS Streaming Software”.
Here’s a summary of some of the benefits we saw in using OBS — and possibly any — streaming software:
- OBS (Open Broadcaster Software) is open-source streaming software, available for Mac, Windows, and Linux platforms.
- It can be used to take the inputs from various audio and video devices and combine them. (We used it to link an iPhone as a video camera and our L-12 mixer as the audio source.)
- Input devices can include multiple cameras, and even switch amongst them.
- The video recorded by OBS is higher quality than the recording downloaded from Facebook Live. Compare 720p and 60 fps to Facebook Live’s 360p and 30 fps.
Case Study A — ZOOM LiveTrak L-12 Mixer Channel Assignment
Notes:
Mixers have both input channels and output channels. The input channels connect your devices — microphones and instruments — via XLR and 1/4” plugs. Mixers typically provide some combination of mono and stereo inputs, with the former being the most common. The latter are usually reserved for inputs from digital devices such as a phone or a computer; for example, providing recorded music before the show starts or during breaks. They have a variety of input connection styles, including RCA and USB, along with XLR and/or 1/4”. Image A.1 illustrates a mixer’s input connections using Cuppa Joe's L-12 mixer as an example.
As mentioned earlier, a mixer usually provides a stereo (i.e. a 2-channel) “main” or “master” output (as well as some monitor outputs). In our case, we have a digital mixer, so it is capable of recording all 12 input channels plus the main or master stereo output channels, and also delivering all 14 channels to a phone, tablet or computer via its USB connection. Our mixer delivers the stereo output on USB Channels 13 and 14, so it doesn’t “over-write” channels 1 and 2 (which contain the sound from the devices connected to those inputs). But some apps, such as Facebook Live, expect their input to be on USB Channels 1 and 2.
The iPhone and iPad tested with this mixer can “see” the mixer, as shown in the right-hand panel of Image B.3, below. And all 14 channels can be monitored via Apple’s app GarageBand, either independently or in stereo pairs, as shown in Image C.1. But there is no way on these devices — the iPhone and iPad — to let Facebook Live know that the mixer’s output channels are 13 and 14. This is the case for our L-12 mixer, but may be different for your mixer; “Case Study B — Viewing Mixer on iPhone” and “Case Study C — Viewing Mixer Channels” illustrate how to check this for your situation.
Notes:
- ZOOM is the company that manufactures a line of sound equipment that includes our L-12 mixer. (It is not Zoom Video Communications, the video conferencing service used so heavily during COVID.)
- Cuppa Joe's mixer provides a range of services, including the ability to record each channel. If you’re new to using a mixer, you don’t necessarily need one with all of the features, nor all of the input channels, that this one provides. In this case study, we are focused on distinguishing input and output channels and those transferred via USB, not on the other features of the mixer.
Mixers have both input channels and output channels. The input channels connect your devices — microphones and instruments — via XLR and 1/4” plugs. Mixers typically provide some combination of mono and stereo inputs, with the former being the most common. The latter are usually reserved for inputs from digital devices such as a phone or a computer; for example, providing recorded music before the show starts or during breaks. They have a variety of input connection styles, including RCA and USB, along with XLR and/or 1/4”. Image A.1 illustrates a mixer’s input connections using Cuppa Joe's L-12 mixer as an example.
As mentioned earlier, a mixer usually provides a stereo (i.e. a 2-channel) “main” or “master” output (as well as some monitor outputs). In our case, we have a digital mixer, so it is capable of recording all 12 input channels plus the main or master stereo output channels, and also delivering all 14 channels to a phone, tablet or computer via its USB connection. Our mixer delivers the stereo output on USB Channels 13 and 14, so it doesn’t “over-write” channels 1 and 2 (which contain the sound from the devices connected to those inputs). But some apps, such as Facebook Live, expect their input to be on USB Channels 1 and 2.
The iPhone and iPad tested with this mixer can “see” the mixer, as shown in the right-hand panel of Image B.3, below. And all 14 channels can be monitored via Apple’s app GarageBand, either independently or in stereo pairs, as shown in Image C.1. But there is no way on these devices — the iPhone and iPad — to let Facebook Live know that the mixer’s output channels are 13 and 14. This is the case for our L-12 mixer, but may be different for your mixer; “Case Study B — Viewing Mixer on iPhone” and “Case Study C — Viewing Mixer Channels” illustrate how to check this for your situation.
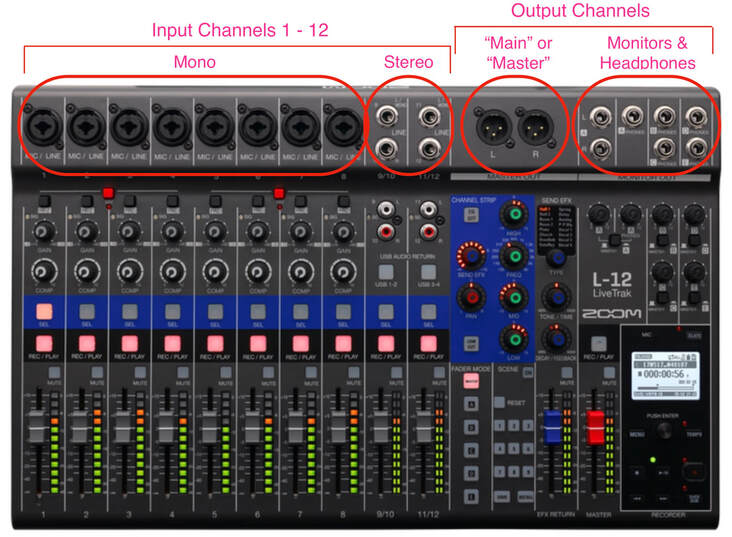
Image A.1 — The L-12 Mixer's Channel Assignments
Case Study B — Viewing Mixer on iPhone
When plugging the ZOOM L-12 mixer into the author’s iPhone, the following steps were used to confirm that the mixer was successfully connected and visible via iOS (the iPhone and iPad operating systems.
Notes:
Here are the steps for confirming your mixer connection to the iOS device, using the L-12 as an example:
1. Using your right index finger, pull down the iOS Control Panel from the top-right of your screen, so that you see what is shown in the first (left-most) screen-capture in Image B.3. (This works for the iPhone X and iPad mini 5, but varies with some iOS devices. For the iPhone 8, for example, you pull the Control Panel menu up from the bottom.)
2. Touch the top-right icon (with the concentric circles, encircled in red) in the right-most square, to produce the second screen-capture in Image B.3. This screen provides information about several things:
3. The checkmark beside “iPhone” confirms that the default audio input has been selected.
4. Turn on your mixer and plug it into your iOS device. Note that — in our case — this resulted in the audio input being changed from “iPhone" to “ZOOM L-12 Driver”. (Curiously, the icon beside this represents a speaker rather than a mic or some other icon depicting an input device.)
When plugging the ZOOM L-12 mixer into the author’s iPhone, the following steps were used to confirm that the mixer was successfully connected and visible via iOS (the iPhone and iPad operating systems.
Notes:
- This works if you have a mixer with a USB output which you can connect to an iOS device. The author used a USB-B to USB-A cable from the mixer output (see Image B.1 below). He connected this to a USB-A to Lightning camera adaptor (see Image B.2), which could be plugged into the iPhone.
- The L-12 mixer has a “Class Compliant Mode” switch that needs to be turned on for use with an iOS device such as an iPhone or an iPad.
Here are the steps for confirming your mixer connection to the iOS device, using the L-12 as an example:
1. Using your right index finger, pull down the iOS Control Panel from the top-right of your screen, so that you see what is shown in the first (left-most) screen-capture in Image B.3. (This works for the iPhone X and iPad mini 5, but varies with some iOS devices. For the iPhone 8, for example, you pull the Control Panel menu up from the bottom.)
2. Touch the top-right icon (with the concentric circles, encircled in red) in the right-most square, to produce the second screen-capture in Image B.3. This screen provides information about several things:
- access to playing mp3s, in the top-most section;
- information about WiFi networks (“speakers & TVs”) in the bottom-most (note that the WiFi network names have been blocked out in this screen capture); and
- the element that interests us: the source of your audio signal in the middle part (encircled in red), which defaults to your device’s internal microphone (“iPhone”, in this case).
3. The checkmark beside “iPhone” confirms that the default audio input has been selected.
4. Turn on your mixer and plug it into your iOS device. Note that — in our case — this resulted in the audio input being changed from “iPhone" to “ZOOM L-12 Driver”. (Curiously, the icon beside this represents a speaker rather than a mic or some other icon depicting an input device.)
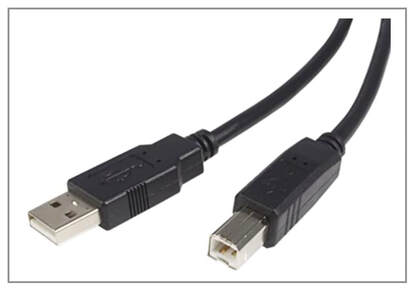
Image B.1 — USB-B to USB-A
|
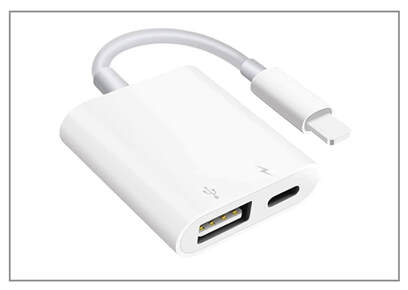
Image B.2 — USB-A to Lightning
|
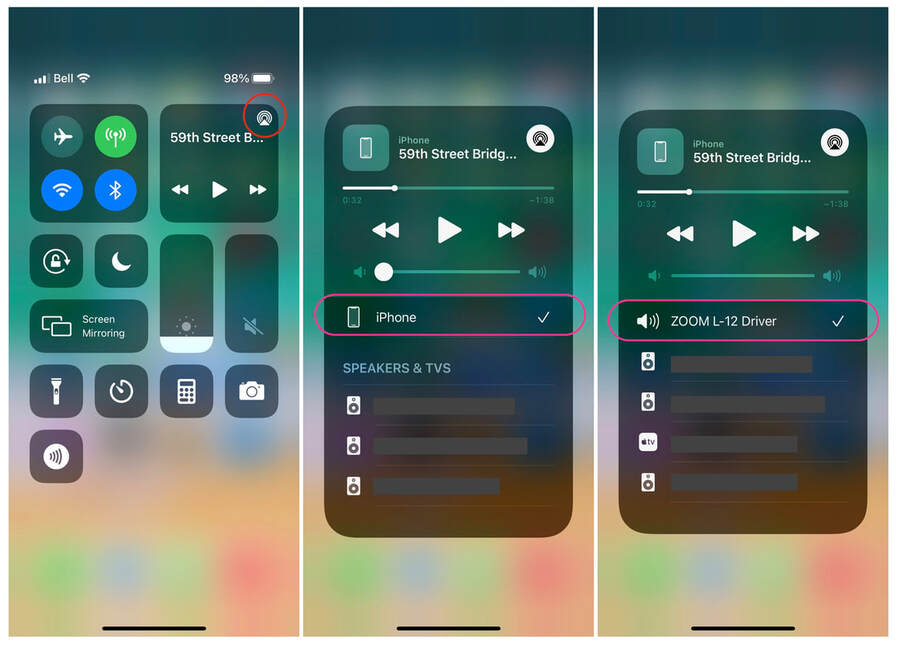
Image B.3 — The iPhone Control Panel
Case Study C — Viewing Mixer Channels
To ascertain how the mixer’s channels are represented on its USB output, the GarageBand app on the Phone was used. (GarageBand is an Apple Computer app.)
Here are the steps followed to view the mixer channels, again using the L-12 as an example:
1. Turn on the mixer (having selected the Class Compliant Mode, if your mixer manufacturer provides this means to communicate with iOS devices) and plug it into your phone.
2. Start GarageBand.
3. Plugging a mic or an instrument into the mixer and producing some sound from it will cause the GarageBand VU meter above the channel number to show the sound level.
4. This is how to determine the output channels:
To ascertain how the mixer’s channels are represented on its USB output, the GarageBand app on the Phone was used. (GarageBand is an Apple Computer app.)
Here are the steps followed to view the mixer channels, again using the L-12 as an example:
1. Turn on the mixer (having selected the Class Compliant Mode, if your mixer manufacturer provides this means to communicate with iOS devices) and plug it into your phone.
2. Start GarageBand.
- You’ll see something like what is pictured in Image C.1. This is a series of screen captures, each of which shows a channel or channel range in the lower left. Channels are selectable by clicking on the displayed channel number at the bottom-left of the screen (encircled in red).
- Clicking on the channel number produces a menu of channel combinations (see Image C.2 for an abbreviated view of the complete list you’d see). In the author’s case, each of the 14 channels was selectable individually, as well as in odd-even pairs (e.g., 1 + 2, 3 + 4, etc., up to 13 + 14).
3. Plugging a mic or an instrument into the mixer and producing some sound from it will cause the GarageBand VU meter above the channel number to show the sound level.
4. This is how to determine the output channels:
- Watch the corresponding channel’s VU meter respond when you speak into your mic or play your connected instrument (Channel 3 in this example).
- The mixer will “mix” the sound you’ve produced on your input channel; so when you switch to viewing the mixer’s stereo output channels, you’ll also see the VU meter for those channels move with the sound you produce.
- Select the channels you think the mixer uses as output, from the channel selection list. If, as with the L-12, your output mix is on your highest-numbered channels (13 and 14 in his case), then that is the VU meter that will move with your sound. The other most likely set of channels for your output sound — if not the highest numbered channels — are Channels 1 and 2.
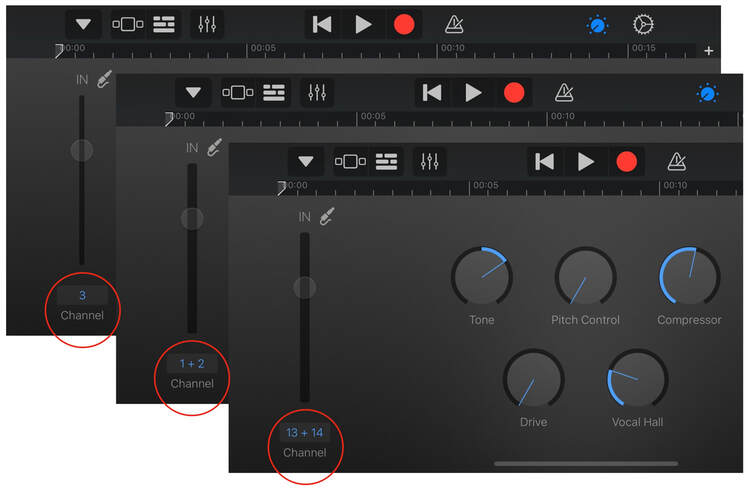
Image C.1 — Listening to Mixer Channels via GarageBand
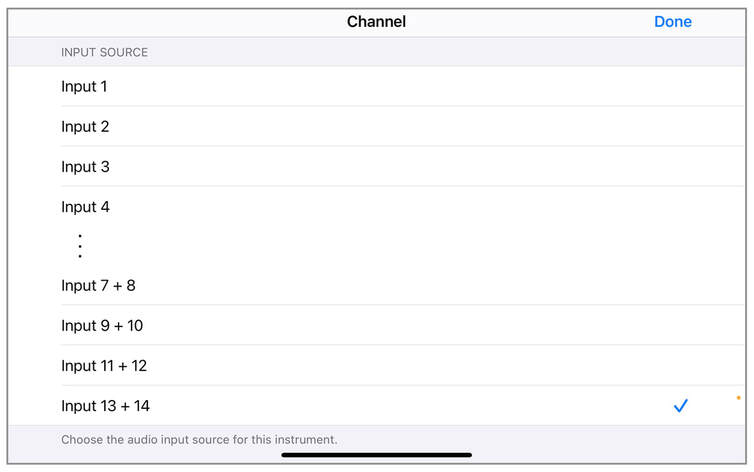
Image C.2— GarageBand Channel Pull-Down Menu
Case Study D — ZOOM LiveTrak L-12 Mixer's Computer-Based Driver
In the case of the ZOOM L-12 mixer, a driver was needed for the computer that was used for the live stream. The driver was downloaded from the ZOOM website and installed — see Image D.1, with the relevant icon encircled in red.
It is unusual for a Macintosh driver to provide a system pane to establish settings. So it was a pleasant surprise to find it, and for it to be conveniently located in the System Preferences. (Most drivers, such as printer drivers, pop up a user interface when needed, instead.)
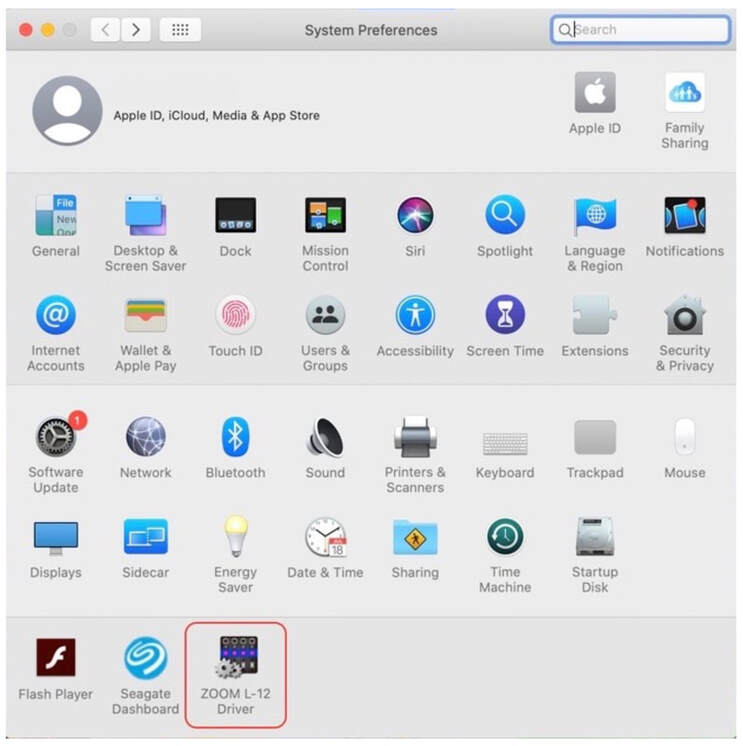
Image D.1 — Mixer Driver Icon on MacBook
As shown in Image D.2, this driver provides an option to move the mixer’s “Master” output channels (13 & 14, in this case) to Channels 1 and 2. Image D.2 is a composite. The top segment shows the initial range of channels. The next one shows the remaining channels that are seen when moving the slider to the right.
The selection defaults to the first radio button, where the channels are displayed in channel pairs (In 1/2 to In 11/12), and where the “Master” output has been assigned to Channels 13 and 14.
Simply select the second radio button (as shown in D.2), and “Master” is moved to Channels 1 and 2. Note that this change causes all of the other channel pairs to be shifted up, in the way the stream is represented to any application using the mixer. But for the live stream, the other channels aren’t used.
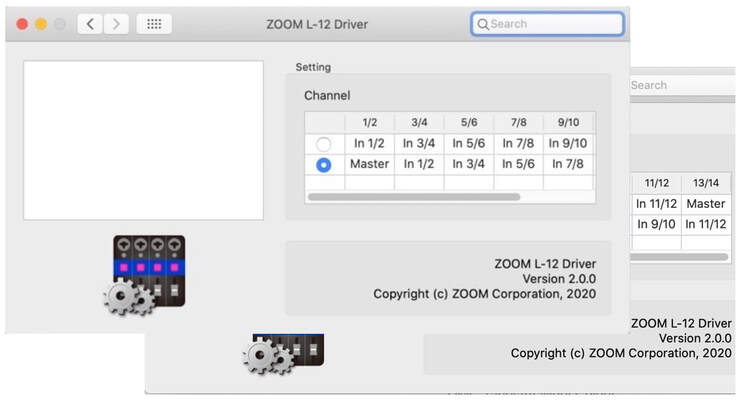
Image D.2 — Mixer Driver Setting on MacBook
Case Study E — Using OBS Streaming Software
We used OBS to link an iPhone as a video camera and our L-12 mixer as the audio source.
To work properly on an iPhone, an OBS app needs to be installed on the phone (see Image E.2) and another OBS app (where it’s traditionally referred to as an “application” or “program”) on the computer (see Image E.1) being used to link the devices and connect to Facebook Live.
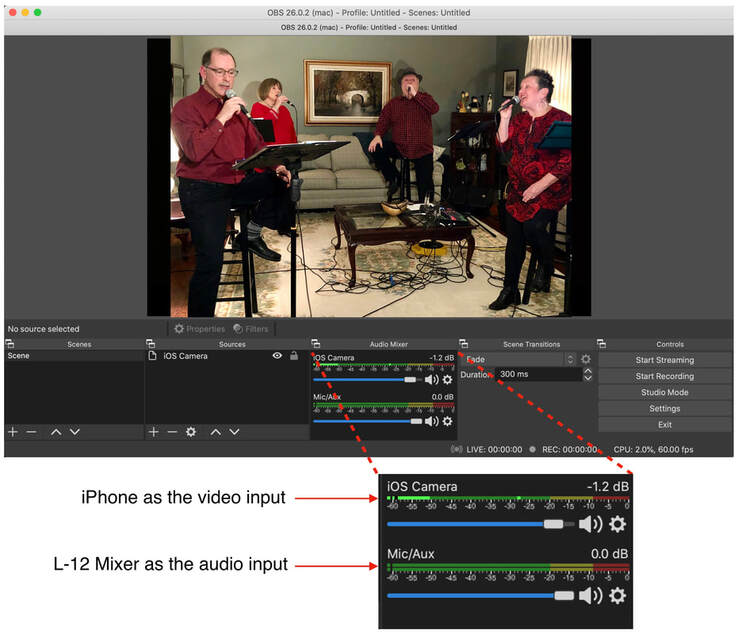
Image E.1 — OBS Computer Interface
Image E.1 illustrates the computer-based OBS app in operation. It’s necessary to identify the camera and the mixer to the OBS app, after which you’ll see the VU meters for these devices displayed. This is done via tabs in the OBS menu. The menu for the audio source, for example, is shown in the bottom portion of Image E.3, where the entry for the ZOOM L-12 Mixer is encircled in red.
The VU meter for the camera, shown in Image E.1, is provided in case you also use the audio input from it; in our case, we used the video from it, but the audio from the mixer.
When using the OBS app on the camera to video-record, you’ll see the video displayed in the large rectangular box (see Image E.1). There are some tools that help you size and orient the image within that rectangle.
A Facebook Live session is set up differently when using streaming software versus directly from your devices. The biggest difference is that you select a streaming key that is generated by Facebook Live. It is quite a long key, so it needs to be copied and pasted into the “Stream Key” spot in the “Stream” menu, as shown encircled in red, in the top portion of Image E.3. This key instructs the OBS software where to deliver the audio and video signals it captures.
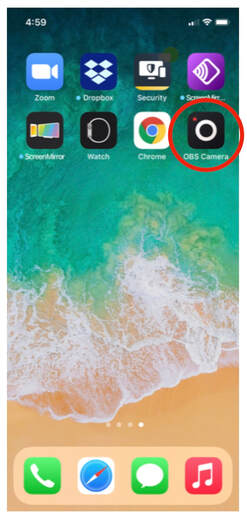
Image E.2 — OBS App Icon on iPhone
|

Image E.3 — Stream and Audio Menus
|
Acknowledgements
Chris Thompson provided excellent technical support in preparing for Cuppa Joe’s concert, was always available as a sounding board, and identified the channel alignment issue between the mixer and Facebook Live. Ian Schwartz provided a significant contribution, when he introduced the author to OBS and identified the
components needed and how they inter-worked.
Thanks to Chris Thompson and Ian Schwartz for their technical reviews of the drafts of this article, and to Peter Feldman and Linda Wilson for providing feedback on its readability.
About the Author
John Wilson is a Professional Engineer who holds a BScEng in Electrical Engineering and an MSc(CS) in Computer Science. His musical background includes fifteen years of piano lessons starting at age five, singing in whatever school choirs and choruses were available to him, and playing trumpet for three years in the school band. He sang in a jazz choir prior to starting Cuppa Joe in 2008. John may be contacted about this article at [email protected].